Python GUI: thinter 简单教程

tkinter 官方文档:

tkinter --- Tcl/Tk 的 Python 接口 — Python 3.12.8 文档

其他的一些文档:

Tkinter GUI 教程 – Tkinter 布局助手 (pytk.net)

Python GUI 之 tkinter 窗口视窗教程大集合(看这篇就够了) - 洪卫 - 博客园 (cnblogs.com)

Tkinter 简明教程 - 知乎 (zhihu.com)

有个很好的用来布局参考的工具,可视化、可拖拽:

Tkinter 布局助手~一款在线设计仅需拖拽就能生成 Tkinter 布局的小工具 (pytk.net)

最近项目需要我了解一下桌面端开发的一整套框架,基础框架中用到了 Python GUI 里的 thinter 包,所以简单做一些记录。

1. Tkinter 编程

tkinter 编程的主体框架:

1
2
3
4
5
6
7
import tkinter
root = tkinter.Tk()

# 各种控件及其设定

# 进入消息循环
root.mainloop()

2. 常用控件

基础组件

组件名称 组件说明
Label 标签
Entry 输入框
Button 按钮组件
Text 文本框
Progressbar 进度条
Radiobutton 单选框
Checkbutton 多选框
Listbox 列表框
Combobox 下拉选择框
Separator 分割线
Spinbox 数字输入框
OptionMenu 下拉菜单
Menu 菜单栏组件
Scale 滑块组件
LabeledScale 带有标签的滑块
BitmapImage 图片组件 GIF
Treeview 树形组件、表格组件
Menubutton 菜单按钮,点击按钮弹出菜单
Scrollbar 滚动条
PhotoImage 图片组件 PGM, PPM, GIF, PNG
Canvas 画布
Sizegrip 尺寸调整组件

Frame 类组件

组件名称 组件说明
Frame 容器组件
LabelFrame 标签框
PanedWindow 分割面板
Notebook 选项卡组件

3. tkinter 三种布局器

在 Tkinter 中,提供了三种布局方式。pack(打包)、grid(网格布局)、place(定位布局)。

布局方法 说明
pack() 按照组件添加到容器的顺序布局。在使用容器(Frame)布局时非常方便,调整窗口大小时布局自动缩放
grid() 网格布局,以行、列来对组件进行布局,较为灵活
place() 定位布局,指定组件大小和位置,最灵活

pack()

打包器,将组件打包进父组件中。

常用参数 说明
anchor 指定组件方向,取值 NSEW, 北南东西,和他们的组合方位,以及 Center
expand 如果父组件的大小增加,则展开当前组件
fill 是否拉伸组件 NONE (不拉伸) 、X (横向拉伸)、Y (竖向拉伸)、BOTH (都拉伸)
side 将组件添加到哪 TOP、 BOTTOM 、 LEFT 、 RIGHT

pack () 布局例子

1
2
3
4
5
6
7
8
9
10
11
12
13
14
15
16
17
18
19
20
21
# 导入tkinter
from tkinter import *
# 导入ttk
from tkinter.ttk import *

# 创建一个窗口
root = Tk()
# 设置标题
root.title("布局器 pack() 演示 ~ Tkinter布局助手")
# 窗口大小设置
root.geometry("500x200")
# 创建一个文本标签
top = Label(root, background="red")
left = Label(root, background="blue")

# 调整这里的顺序试试
left.pack(side=LEFT, fill=BOTH)
top.pack(side=TOP, fill=BOTH)

# 展示窗口
root.mainloop()

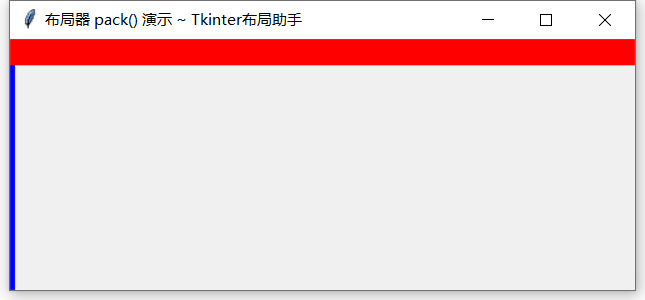
pack 的布局跟添加的顺序有关,注意下面图的红色和蓝色相交位置,体会其中差别。
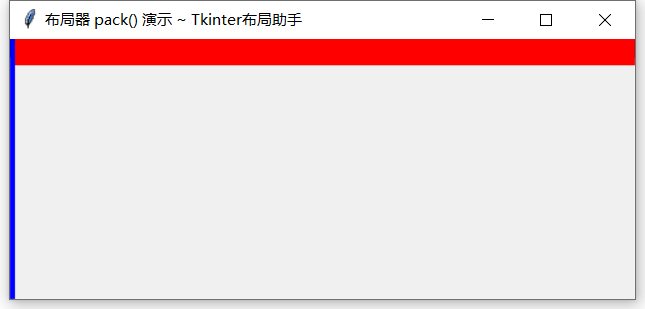
先添加left后添加top
先添加top后添加left

grid()

网格布局,用类似网格的形式,将界面分为几行,几列,每个组件布置在相应的格子里。

常用参数 说明
column 组件在第几列 默认从 0 开始
columnspan 这个组件跨了几个列
row 组件在第几行 默认从 0 开始
rowspan 这个组件跨了几行
sticky 组件在单元格内,靠近哪边,默认居中

grid () 布局例子

1
2
3
4
5
6
7
8
9
10
11
12
13
14
15
16
17
18
# 导入tkinter
from tkinter import *
# 导入ttk
from tkinter.ttk import *

# 创建一个窗口
root = Tk()
# 设置标题
root.title("布局器 grid() 演示 ~ Tkinter布局助手")
# 窗口大小设置
root.geometry("500x200")

for i in range(1, 4):
for j in range(1, 4):
btn = Button(root, text=str(i * j))
btn.grid(column=i, row=j)
# 展示窗口
root.mainloop()
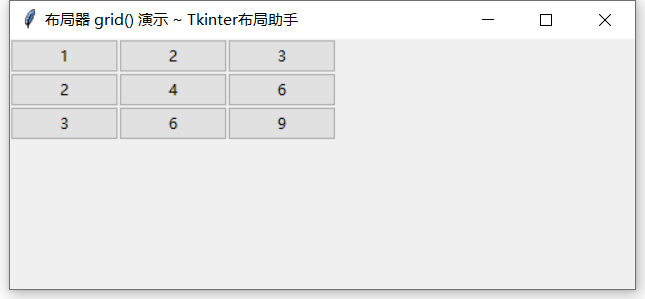
grid布局

place()

三种中最灵活的一种,可以指定大小和绝对位置布局,也可以相对父组件的大小、相对位置布局。 Tkinter 布局助手就是基于 place () 的布局方式实现的。

常用参数 说明
width 组件的宽度 默认单位像素
height 组件高度 默认单位像素
x 相对父组件的 x 轴位置 (距顶部的距离) 默认单位像素
y 相对父组件的 y 轴位置 (距左边的距离) 默认单位像素
relwidth 组件的宽度 相对于父组件的宽度,取值 0-1 为 1 时与父组件宽度一致
relheight 组件的高度 相对于父组件的高度,取值 0-1 为 1 时与父组件高度一致
relx 相对父组件的 x 轴位置 (距顶部的距离) 取值 0-1 为 1 时与父组件宽度一致
rely 相对父组件的 y 轴位置 (距左边边的距离) 取值 0-1 为 1 时与父组件高度一致

grid () 布局例子

1
2
3
4
5
6
7
8
9
10
11
12
13
14
15
16
17
18
19
20
# 导入tkinter
from tkinter import *
# 导入ttk
from tkinter.ttk import *

# 创建一个窗口
root = Tk()
# 设置标题
root.title("布局器 place() 演示 ~ Tkinter布局助手")
# 窗口大小设置
root.geometry("500x200")

btn = Button(root, text="相对大小 大小位置可随窗口大小变化")
btn.place(relheight=0.2, relwidth=0.5, relx=0.2, rely=0.3)

btn2 = Button(root, text="按钮")
btn2.place(height=50, width=80, x=10, y=20)

# 展示窗口
root.mainloop()
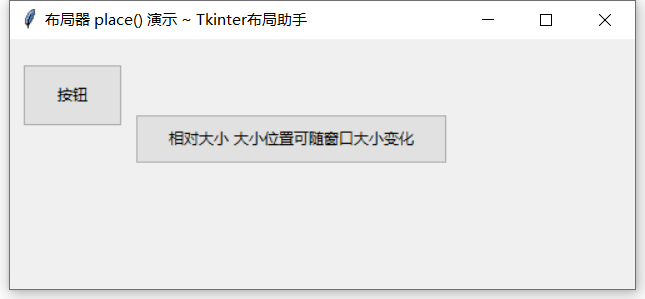
place布局

调整大小后,图中的小按钮大小和位置没有变化,设置相对大小的按钮大小发生了变化。
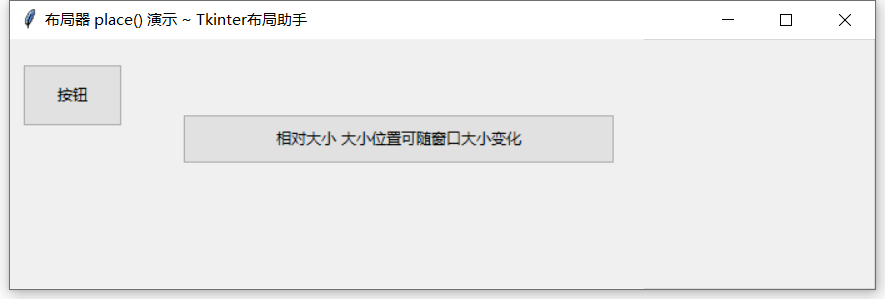
拉伸后

对此,那我们使用控件的时候,根据情况选择相对大小还是绝对大小,同样的,使用 tkinter 布局助手可以十分方便进行控件的布局。

4. 关于 TTK

TKinter Tk 与 ttk 的区别 – Tkinter 布局助手 (pytk.net)

Tkinter 模块是 Python 的标准 Tk GUI 工具包的接口。

Tk 和 Tkinter 可以在大多数的 Unix 平台下使用,同样可以应用在 Windows 和 Mac 系统里。Tk8.0 的后续版本可以通过 ttk 实现本地窗口风格,并良好地运行在绝大多数平台中。

尽量使用 ttk 组件。

TTK 效果演示

演示代码

1
2
3
4
5
6
7
8
9
10
11
12
13
14
15
16
17
18
19
20
21
22
23
24
25
26
27
28
29
30
31
32
33
34
35
36
37
38
39
40
41
42
43
44
45
46
47
48
49
50
51
52
53
54
55
56
57
58
59
60
61
62
63
64
65
66
67
68
69
70
71
72
73
74
75
76
77
78
79
80
81
82
83
84
85
86
87
88
89
90
91
92
93
94
95
96
97
98
99
100
101
102
103
104
105
106
107
108
109
110
111
112
113
114
from tkinter import *
from tkinter.ttk import *


class Win:
def __init__(self):
self.root = self.__win()
self.tk_label_l61k2rxh = self.__tk_label_l61k2rxh()
self.tk_input_l61k35ee = self.__tk_input_l61k35ee()
self.tk_label_l61k3i5r = self.__tk_label_l61k3i5r()
self.tk_check_button_l61k3rgq = self.__tk_check_button_l61k3rgq()
self.tk_check_button_l61k449f = self.__tk_check_button_l61k449f()
self.tk_check_button_l61k4hdx = self.__tk_check_button_l61k4hdx()
self.tk_check_button_l61k4pw1 = self.__tk_check_button_l61k4pw1()
self.tk_label_l61k56rj = self.__tk_label_l61k56rj()
self.tk_radio_button_l61k5gk4 = self.__tk_radio_button_l61k5gk4()
self.tk_radio_button_l61k5r4p = self.__tk_radio_button_l61k5r4p()
self.tk_select_box_l61k6jik = self.__tk_select_box_l61k6jik()
self.tk_label_l61k6ngn = self.__tk_label_l61k6ngn()
self.tk_button_l61k71gi = self.__tk_button_l61k71gi()
self.tk_button_l61k7gt7 = self.__tk_button_l61k7gt7()

def __win(self):
root = Tk()
root.title("tk与ttk对比 ~ Tkinter布局助手")
# 设置大小 居中展示
width = 600
height = 500
screenwidth = root.winfo_screenwidth()
screenheight = root.winfo_screenheight()
geometry = '%dx%d+%d+%d' % (width, height, (screenwidth - width) / 2, (screenheight - height) / 2)
root.geometry(geometry)
root.resizable(width=False, height=False)
return root

def show(self):
self.root.mainloop()

def __tk_label_l61k2rxh(self):
label = Label(self.root, text="姓名")
label.place(x=50, y=60, width=50, height=24)
return label

def __tk_input_l61k35ee(self):
ipt = Entry(self.root)
ipt.place(x=120, y=60, width=150, height=24)
return ipt

def __tk_label_l61k3i5r(self):
label = Label(self.root, text="爱好")
label.place(x=50, y=100, width=50, height=24)
return label

def __tk_check_button_l61k3rgq(self):
cb = Checkbutton(self.root, text="唱")
cb.place(x=120, y=100, width=54, height=24)
return cb

def __tk_check_button_l61k449f(self):
cb = Checkbutton(self.root, text="跳")
cb.place(x=190, y=100, width=54, height=24)
return cb

def __tk_check_button_l61k4hdx(self):
cb = Checkbutton(self.root, text="rap")
cb.place(x=260, y=100, width=54, height=24)
return cb

def __tk_check_button_l61k4pw1(self):
cb = Checkbutton(self.root, text="篮球")
cb.place(x=330, y=100, width=54, height=24)
return cb

def __tk_label_l61k56rj(self):
label = Label(self.root, text="性别")
label.place(x=50, y=142, width=50, height=24)
return label

def __tk_radio_button_l61k5gk4(self):
rb = Radiobutton(self.root, text="男")
rb.place(x=120, y=140, width=57, height=24)
return rb

def __tk_radio_button_l61k5r4p(self):
rb = Radiobutton(self.root, text="女")
rb.place(x=190, y=140, width=57, height=24)
return rb

def __tk_select_box_l61k6jik(self):
cb = Combobox(self.root, state="readonly")
cb['values'] = ("本科", "专科", "高中")
cb.place(x=120, y=180, width=150, height=24)
return cb

def __tk_label_l61k6ngn(self):
label = Label(self.root, text="学历")
label.place(x=50, y=180, width=50, height=24)
return label

def __tk_button_l61k71gi(self):
btn = Button(self.root, text="登记")
btn.place(x=100, y=410, width=143, height=40)
return btn

def __tk_button_l61k7gt7(self):
btn = Button(self.root, text="清空")
btn.place(x=340, y=410, width=143, height=40)
return btn


if __name__ == "__main__":
win = Win()
# TODO 绑定点击事件或其他逻辑处理
win.show()

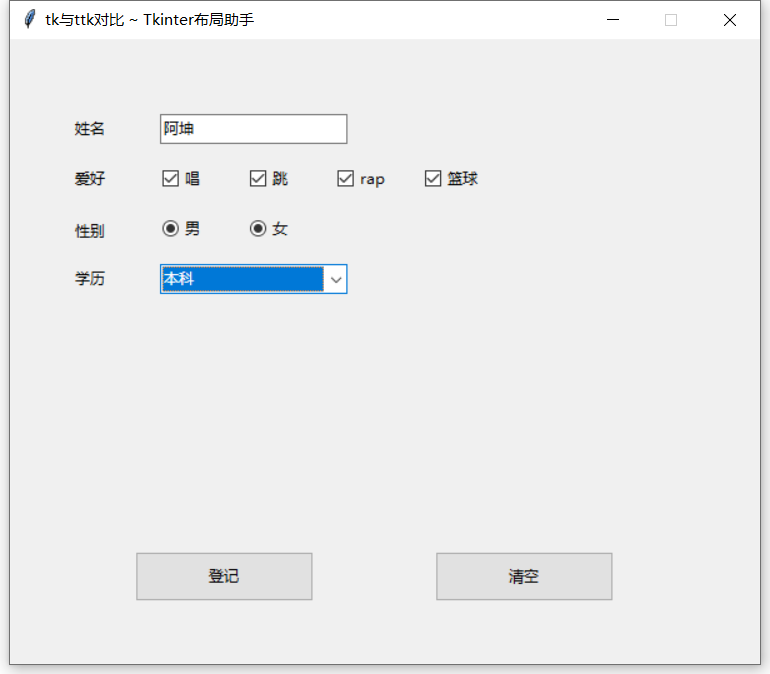
截图

ttk效果

ttk 组件多于 tk,界面也相对 tk 漂亮,所以使用时尽量选择 ttk。因为 ttk 也是 python 原生支持的,不需要额外去下载。按照以下方式导入组件就行了,ttk 中的组件会默认替换掉 tk 的。

1
2
from tkinter import *
from tkinter.ttk import *

5. Label 标签

TKinter Label 标签组件 – Tkinter 布局助手 (pytk.net)

Label 标签组件,是最简单的组件之一。它是一个非交互式小部件,其唯一目的是向用户展示文字和图片。

常用属性

属性名 说明
image 指定要展示的图片。建议使用 PIL 的 Image, ImageTk 模块导入图片,少走弯路详见例子(PhotoImage 支持的格式较少,不支持图片缩放)
compound 混合模式。当 image 与 text 属性一起使用时。设置为 CENTER 文本则展示在图片上,其他选项包括 BOTTOM、LEFT、RIGHT、TOP 展示在图片旁边
cursor 指定控件使用的鼠标光标
style 设置样式
text 要在标签中显示的文本字符串
textvariable 指定一个变量,设置展示的文本,并在变量变化时,界面展示的文本自动更新 (类似前端 Vue 中的参数双向绑定)
underline 下划线。取值为数字,表示第几位字符开启下划线,取值从 0 开始,-1 为不开启下划线
width 组件宽度
anchor 控制内容在标签内的方向,默认居中。
background 设置背景颜色
font 设置字体
foreground 前景色
justify 文本的对齐方式。取值范围 left (左)、center (中)、right (右)。
padding 组件内边距 (与 html 中的 padding 类似)

Label 组件示例代码

1
2
3
4
5
6
7
8
9
10
11
12
13
14
15
16
17
18
19
20
21
22
23
24
25
26
27
28
29
30
31
# 导入tkinter
from tkinter import *
# 导入ttk
from tkinter.ttk import *

from PIL import Image, ImageTk

# 创建一个窗口
win = Tk()
# 设置标题
win.title("Label 演示 ~ Tkinter布局助手")
# 窗口大小设置
win.geometry("500x200")

txt = StringVar(value="我是Label组件,没有图片")
label1 = Label(win, textvariable=txt) # 给标签绑定一个变量
label1.pack(side=LEFT)

img = Image.open("img.png")
img = img.resize((50, 50))
img = ImageTk.PhotoImage(img)
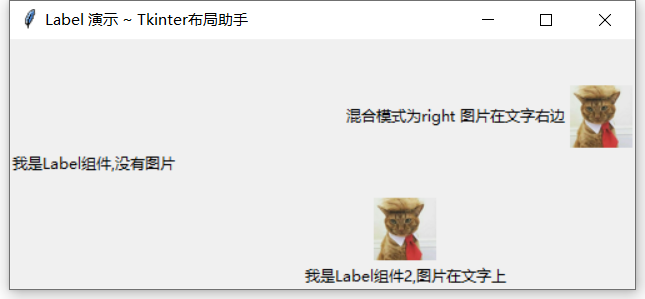
label2 = Label(win, image=img, text="我是Label组件2,图片在文字上")
label2.configure(compound=TOP)
label2.pack(side=BOTTOM)

label3 = Label(win, image=img, text="混合模式为right 图片在文字右边")
label3.configure(compound=RIGHT) # 混合模式为right 图片在文字右边
label3.pack(side=RIGHT)

# 展示窗口
win.mainloop()
Label组件

6. Entry 输入框

TKinter Entry 输入框组件 – Tkinter 布局助手 (pytk.net)

Entry 组件是 Tkinter 中最常用的图形组件之一,用于接收用户的输入,实现程序与用户的交互。常用于一些表单、数据录入等情景。

常用属性

属性名 说明
background 背景色
foreground 前景色 文字颜色
justify 文本的对齐方式。取值范围 left (左)、center (中)、right (右)。
width 输入框宽度
textvariable 指定一个变量,设置展示的文本,并在变量变化时,界面展示的文本自动更新
show 当用作密码框时,show="*"

常用方法

方法名 说明
delete() 删除内容,传入要删除文字的起始下标
get() 获取输入框的值
insert() 在文本框中插入指定文本

数据验证

要开启数据验证,需要设置以下三个选项。

属性 说明
validate 触发验证的方式。
validatecommand 绑定验证方法
invalidcommand 验证失败的处理

validate 取值说明

  • focus:获得或者失去焦点的时候验证。
  • focusin:获得焦点的时候验证。
  • focusout:失去焦点的时候验证。
  • key:当输入框被编辑的时候验证。
  • all:以上情况都验证。
  • none:关闭验证。默认值。

validatecommand 选项需要绑定一个验证方法,该方法只返回布尔值,代表验证是否通过。

invalidcommand 选项用于处理验证未通过的情况,只有在 validatecommand 绑定的方法返回 False 才执行。

Entry 组件示例

1
2
3
4
5
6
7
8
9
10
11
12
13
14
15
16
17
18
19
20
21
22
23
import tkinter as tk
import tkinter.ttk as ttk
from tkinter import messagebox

win = tk.Tk()
win.geometry("300x100")


def msg():
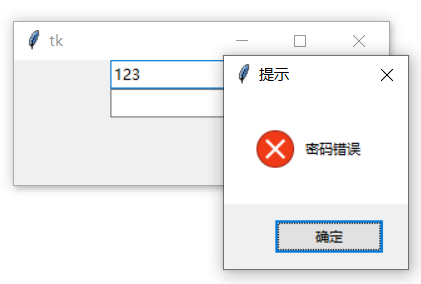
messagebox.showerror("提示", message="密码错误")


def rule():
print(txt.get())
return txt.get() == "123456"


txt = ttk.Entry(win)

txt.configure(validate="focusout", validatecommand=rule, invalidcommand=msg)
txt.pack()
ttk.Entry(win).pack()
win.mainloop()
Entry数据验证示例

7. Button 按钮

Tkinter Button 按钮组件简介 – Tkinter 布局助手 (pytk.net)

Button 组件是 tkinter 中最常用的组件之一,通常用于绑定(函数)某一操作,用户点击按钮后就会执行该操作。当然按钮也可以不绑定函数,但点击后不会执行任何操作,仅充当展示作用。

常用属性

属性名 说明
image 背景图片 (建议使用 PIL 的 Image, ImageTk 模块导入图片)
command 绑定操作,回调函数,点击按钮时执行
state 按钮状态。 DISABLED (禁用),ACTIVE (激活),NORMAL (默认)
text 按钮上的文字
textvariable 指定一个变量,设置展示的文本,并在变量变化时,按钮上的文本自动更新
padding 内边距 (像素)

Button 按钮组件示例代码

基础使用

1
2
3
4
5
6
7
8
9
10
11
12
13
14
15
16
import tkinter as tk
import tkinter.ttk as ttk
from tkinter import messagebox

win = tk.Tk()
win.geometry("200x200")


def click():
messagebox.showinfo('提示', message="点击了按钮")


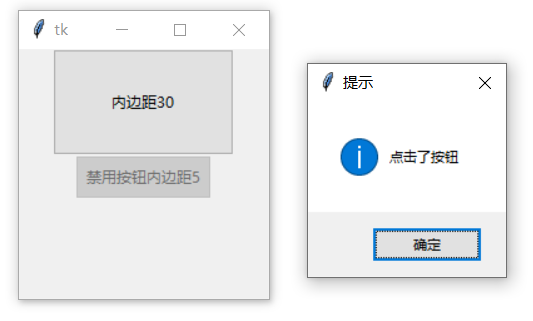
ttk.Button(win, text="内边距30", padding=30, command=click).pack()
ttk.Button(win, text="禁用按钮内边距5", padding=5, state=tk.DISABLED).pack()

win.mainloop()
按钮组件示例

背景图片

1
2
3
4
5
6
7
8
9
10
11
12
13
14
15
16
import tkinter as tk
import tkinter.ttk as ttk

from PIL import Image, ImageTk

win = tk.Tk()
win.geometry("200x200")

img = Image.open("img.png")
img = img.resize((50, 50))
img = ImageTk.PhotoImage(img)

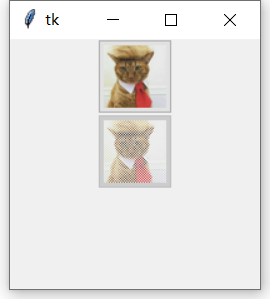
ttk.Button(win, text="内边距30", image=img).pack()
ttk.Button(win, text="内边距30", image=img, state=tk.DISABLED).pack()

win.mainloop()
按钮背景图片示例

8. Text 文本框

Tkinter Text 文本框组件简介 – Tkinter 布局助手 (pytk.net)

Text 文本框组件是 tkinter 中最常用的组件之一,是比较复杂的组件,一般用于展示多行文本。单行文本通常使用 Entry 输入框组件

Text 文本框组件类型网页中的富文本编辑框,不仅可以编辑文字,还可以设置文字颜色,插入超链接等。Text 文本框组件是 tk 中的组件,在 ttk 中没有对其重新实现。

常用属性

属性名 说明
background 背景颜色
fg 前景色 文字的颜色
bd 组件边框宽度。默认是 2 像素。
selectbackground 选择文字时的背景色
xscrollcommand 设置水平滚动条
yscrollcommand 设置垂直滚动条
insertbackground 输入框内光标的颜色
insertofftime 光标闪烁时 消失持续时间 默认 300
insertontime 光标闪烁时 显示持续时间 默认 600
insertwidth 光标宽度 默认 2 像素
spacing1 每个段落的行高 默认 0
spacing2 一个段落内的行高 (没有回车,超过行宽换行的情况) 默认 0
spacing3 段落底部,如果有换行在最后一行添 默认 0
state 文本框状态,默认 NORMAL DISABLED (禁用)

常用方法

属性名 说明
delete(startindex, [,endindex]) 删除范围内字符,或删除指定字符
get(startindex, [,endindex]) 获取文本内容,获取范围内的文本内容
insert(index, [,string]) 在指定位置插入文本
1
2
3
4
5
6
7
8
9
10
11
12
13
14
import tkinter as tk

win = tk.Tk()
win.geometry("500x300")

txt = tk.Text(selectbackground="red", insertbackground="blue", spacing2=10, bd=0)
txt.pack(fill=tk.BOTH, expand=True)
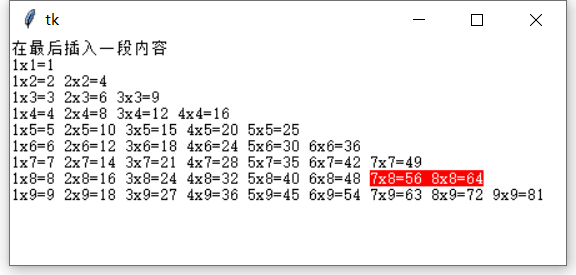
txt.insert(tk.END, "在最后插入一段内容\r\n")
for i in range(1, 10):
for j in range(1, i + 1):
txt.insert(tk.END, f"{j}x{i}={i * j} ")
txt.insert(tk.END, "\r\n")

win.mainloop()
Text组件示例

文本框标签相关方法

属性名 说明
tag_add(tagName, index1,index2) 给指定范围内的文本添加标签
tag_bind(tagName,sequence,func) 给标签绑定事件
tag_unbind(tagName,sequence) 取消标签绑定的事件
tag_configure(tagName) 标签选项配置
tag_delete(tagNames) 删除标签
1
2
3
4
5
6
7
8
9
10
11
12
13
14
15
16
17
18
19
20
21
from tkinter import *
from webbrowser import open as webopen

win = Tk()
win.geometry('500x300')

text = Text(win)

text.tag_configure('link', foreground='blue', underline=True)
# 第三个额外参数会作为这段文本的标签
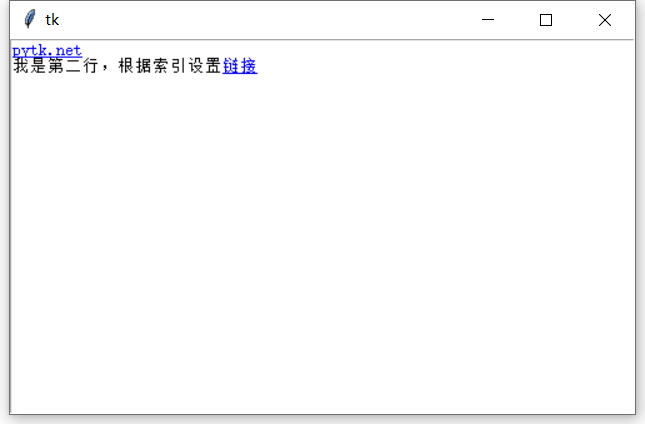
text.insert(END, 'pytk.net\r\n', 'link')
text.insert(END, "我是第二行,根据索引设置链接")

# 文字索引 行.列
text.tag_add("link", "2.12", "2.15")

# 为link标签绑定点击事件
text.tag_bind('link', '<Button-1>', lambda evt: webopen('www.pytk.net'))
text.pack(fill=BOTH)

win.mainloop()
文本框标签演示

嵌入图片和组件

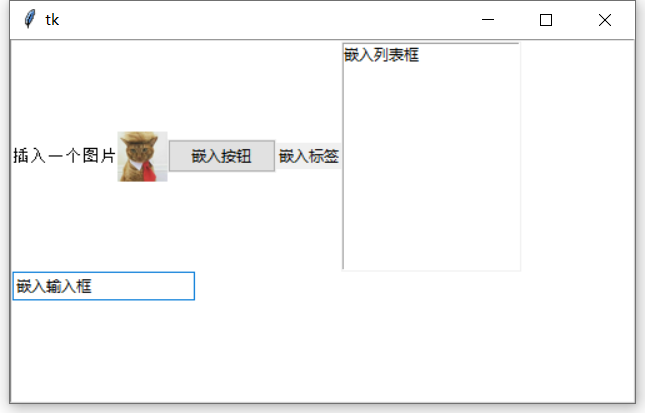
这个功能还是挺强大的,可以在文本框内嵌入图片和组件,但是能用到的场景比较少。

属性名 说明
image_create 在文本框嵌入图片
window_create 在文本框嵌入组件
1
2
3
4
5
6
7
8
9
10
11
12
13
14
15
16
17
18
19
20
21
22
23
24
25
26
27
28
29
from tkinter import *
from tkinter.ttk import *

from PIL import Image, ImageTk

win = Tk()
win.geometry('500x300')

text = Text(win, bg="#fff")
text.insert(END, "插入一个图片")

img = Image.open("img.png")
img = img.resize((40, 40))
img = ImageTk.PhotoImage(img)
text.image_create(END, image=img)

# 嵌入按钮
text.window_create(END, window=Button(text="嵌入按钮"))
text.window_create(END, window=Label(text="嵌入标签"))
lsbox = Listbox()
lsbox.insert(END, "嵌入列表框")
text.window_create(END, window=lsbox)
ipt = Entry()
ipt.insert(END, "嵌入输入框")
text.window_create(END, window=ipt)

text.pack(fill=BOTH, expand=True)

win.mainloop()
文本框嵌入窗体

9. Progressbar 进度条

Tkinter Progressbar 进度条组件简介 – Tkinter 布局助手 (pytk.net)

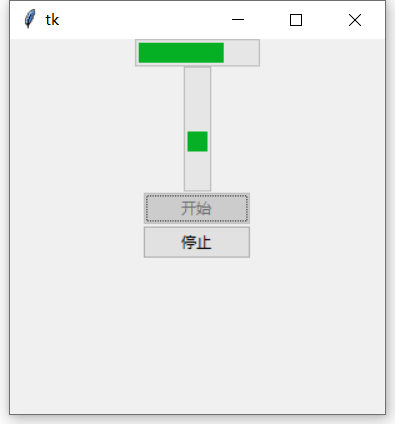
Tkinter 的 Progressbar 进度组件,是 ttk 新增的组件之一,主要用于进度的展示,让用户可以直观的了解到程序的实时进度情况。

进度条主要有两种模式,一种是,指针从起点到终点,用于程序知道当前的进度或完成时间,这也是默认模式。另一种,指针会在起点和终点来回移动,用于程序不确定当前进度或完成时间。

常用属性

属性名 说明
length 进度条长度
maximum 进度条的最大值 默认 100
mode 模式 determinate (默认) indeterminate (来回移动)
orient 进度条方向 默认水平 (horizontal) 垂直 (vertical)
value 进度条值
variable 通过变量设置进度条值 取值 IntVar类型

常用方法

方法名 说明
start(interval) 开始展示进度。传参设置隔多久执行一次 step 方法 默认是 50ms
step(amount) 进度条数量增加量 默认为 1
stop(amount) 停止进度条

进度条组件示例代码

1
2
3
4
5
6
7
8
9
10
11
12
13
14
15
16
17
18
19
20
21
22
23
24
25
26
27
28
29
30
31
32
33
34
import threading
import time
from tkinter import *
from tkinter.ttk import *

win = Tk()
win.geometry("300x300")
val = IntVar(value=0)
p1 = Progressbar(win, variable=val)
p1.pack(side=TOP)
p2 = Progressbar(win, mode="indeterminate", orient=VERTICAL)
p2.pack()


def start():
p2.start()
b1.configure(state=DISABLED)
# 开一个线程 模拟进度 防止界面卡顿
threading.Thread(target=update_p1).start()


def update_p1():
global val
for i in range(100):
val.set(i)
time.sleep(0.1)


b1 = Button(text="开始", command=start)
b1.pack()
b2 = Button(text="停止", command=lambda: p2.stop())
b2.pack()

win.mainloop()
进度条组件示例

10. Radiobutton 单选框

Tkinter Radiobutton 单选框简介 – Tkinter 布局助手 (pytk.net)

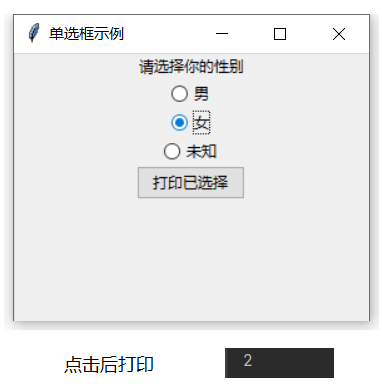
Radiobutton 单选框,在多个选项下,用户只能选择其中一项。

常用属性

属性名 说明
text 单选框文字
variable 绑定单选框状态的变量,单选框选择变化后,会将单选框中 value 属性设置的值更新到绑定的变量. IntVar/StringVar 类型

单选框示例代码

1
2
3
4
5
6
7
8
9
10
11
12
13
14
15
16
from tkinter import *
from tkinter.ttk import *

win = Tk()
win.title("单选框示例")
win.geometry("200x200")

val = StringVar()
Label(win, text="请选择你的性别").pack()
Radiobutton(win, text="男", variable=val, value=1).pack()
Radiobutton(win, text="女", variable=val, value=2).pack()
Radiobutton(win, text="未知", variable=val, value=3).pack()

Button(win, text="打印已选择", command=lambda: print(val.get())).pack()

win.mainloop()

单选框示例截图

选中单选框后,点击按钮,效果如下。

单选框示例截图

Python GUI: thinter 简单教程
https://excelius.xyz/python-gui-thinter-简单教程/
作者
Excelius
发布于
2025年1月13日
许可协议